Saturday, March 18, 2017
eMMC Pro Universal Device Programmer V 1 01 News
eMMC Pro Universal Device Programmer V 1 01 News
eMMC Pro V1.01 Release
[18 May 2016]

Unofficial Support Site by Welcome Zone Haldwani
Description :eMMC Pro V1.01 Released
Release Notes:
News :
Support ISP voltages.
Support eMMC / SD / eMCP Types .
General I/O options implemented hardware
Partition display function is added
Save File bug Fixed
Resume Function bug Fixed
Selecting Hardware option added ( eMMC Booster and eMMC Pro )
Disk Size is added to full read option .
EXT_CSD read / write added.
You can now operate with almost all mobile phones with eMMC / eMCP inside !
Advanced eMMC Repair
Universal Device Programmer
Free eMMC Booster with eMMC Pro Hardware
JTAG Finder Started
Service Database for your center
eMMC Booster - Faster than Fastest !
eMMC PRo - Universal Device Programmer
www.eMMC-Pro.comAvailable link for download

Saturday, March 11, 2017
Fixing Device or computer could not be verified on the App Store
Fixing Device or computer could not be verified on the App Store
So far Ive run into issues with the App Store on every computer Ive hackintoshed and the fix has been the same for every single one so I figured Id post it here.
What you will need: Your network kexts and EFI Studio
1) Install your network kext(s). Once you have working ethernet and/or airport you can proceed.
2) After getting connected, go into System Preferences>Network and delete all devices from the list at the left. The click on locations and delete all locations so that only "Automatic" is left. Close System Preferences.
3) Navigate to /Library/Preferences/SystemConfiguration and delete all the .plist files associated with networking, ie; NetworkInterfaces.plist, com.apple.Network.Identifaction.plist, com.apple.airport.identification.plist
4) open EFI Studio and select "Ethernet" from the drop down menu. Click on add device. When the new window pops up, click on "Hex String to Clipboard"
5) open a terminal type
or
depending on which boot loader you are using.
6) Add a section that looks like this at the bottom
You will more than likely need to add the arguments "PCIRootUID=1" and "npci=0x2000" to kernel flags for this to work.
7) Lastly, add a section that looks like this to your boot.plist
Then reboot. Once your computer reboots, go into System Preferences > Network and click on assistant. Start the process to add a new network interface and more than likely it will detect, configure and connect to your network. At which point, you should be able to connect to the app store without running in to the "device could not be verified" error. If you primarily use wifi, you will still have to do this at least once with wired ethernet to get it working but after you have successfully downloaded at least one app, the error will go away and youll be able to connect to the App Store wirelessly. So if there are no kexts fro your particular ethernet NIC, youre probably not going to be able to connect to the app store
Note:
This will only work on devices that actually register as an airport card. Dongles like the Netgear WG111 that use the Realtek Wireless Utility to connect will not register properly and can not download from the app store.
Just for reference, here is my whole boot.plist.
<!DOCTYPE plist PUBLIC "-//Apple//DTD PLIST 1.0//EN" "http://www.apple.com/DTDs/PropertyList-1.0.dtd">
<plist version="1.0">
<dict>
<key>EthernetBuiltIn</key>
<string>Yes</string>
<key>GraphicsEnabler</key>
<string>Yes</string>
<key>Kernel</key>
<string>mach_kernel</string>
<key>Kernel Flags</key>
<string>arch=i386 npci=0x2000</string>
<key>PCIRootUID</key>
<string>1</string>
<key>Legacy Logo</key>
<string>Yes</string>
<key>Quiet Boot</key>
<string>Yes</string>
<key>Timeout</key>
<string>0</string>
<key>Default Partition</key>
<string>hd(0,6)</string>
<key>device-properties</key>
<string>4b00000001000000010000003f0000000100000002010c00d041030a0000000001010600011c0101060000007fff0400160000006200750069006c0074002d0069006e0000000500000001</string>
</dict>
</plist>
Available link for download
Wednesday, February 15, 2017
Galaxy S Advance i9070 Android 4 1 2 Root And Delete Unwanted System Apps To Speed Up The Device
Galaxy S Advance i9070 Android 4 1 2 Root And Delete Unwanted System Apps To Speed Up The Device
 Samsung Galaxy S Advance, one of the old successor in Galaxy series cant manage to run Android 4.1.2 smoothly due to its average specs. The device packed with a Dual-core 1 GHz Cortex-A9 CPU and 768 MB of RAM memory. As a Samsung device S Advance also bloated with many Samsung apps like ChatOn, S Voice, Samsung App store, etc. Many of the users not uses most of these pre installed apps and they are not able to remove these system apps due to lack of root permission.
According to many Galaxy S Advance users, the device freezes frequently even after the update to the available latest update Android 4.1.2. As Samsung hasnt released an update fix to the S Advance, the only solution which prevents the device from frequent freezing is clearing the ROM memory by removing the unwanted System apps. You can remove any of the system app by gaining root access.
In this post I included the simplest and best way to root Samsung Galaxy S Advance without using Computer. This root process is safer as it will not change the kernel and will not increase the binary count.
Note:
- This root is only for Galaxy S Advance i9070 Android 4.1.2
- Minimum 50% charge required
- Rooting may void warranty
- I am not responsible for any damage do at your risk.
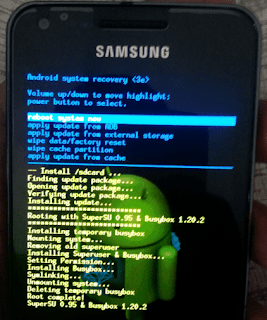
Galaxy S Advance Android 4.1.2 Root
1. Download root.zip - Download2. Copy root.zip to external SD card.
3. Reboot S Advance to recovery mode ( Volume up + Home + Power ).
4. In recovery select apply update from external storage.
( use volume buttons to navigate and power button to select )
5. On the next screen, select root.zip and wait to finish installation.
6. Finally ... Go back and select reboot system now.
Thats it...
After root you can remove any system apps to get more free memory, which will speed up your S Advance. Follow the below post to uninstall system apps.
How To Remove System Apps in Android ?
Available link for download
Monday, November 28, 2016
Driver USB Untuk Semua Device Samsung
Driver USB Untuk Semua Device Samsung
 Ini Adalah Driver Untuk Semua Jenis Handphone Samsung (works for all Samsung device) , Anda dapat menggunakan Driver USB Untuk Semua Device Samsung ponsel ini untuk debugging atau jika Anda telah menghapus dari telepon .
Silahkan Anda Pilih Driver USB Di Bawah ini .
(works for all Samsung device):
- DOWNLOAD SAMSUNG USB DRIVER V1.5.33.0
- DOWNLOAD SAMSUNG USB DRIVER V1.5.45.0
- DOWNLOAD SAMSUNG USB DRIVER V1.5.49.0
- DOWNLOAD SAMSUNG USB DRIVER V1.5.51.0
- DOWNLOAD SAMSUNG USB DRIVER V1.5.55.0
- DOWNLOAD SAMSUNG USB DRIVER V1.5.59.0
- DOWNLOAD SAMSUNG USB DRIVER V1.5.60.0
- DOWNLOAD SAMSUNG USB DRIVER V1.5.33.0 - New!
- DOWNLOAD SAMSUNG USB DRIVER V1.5.45.0 - New!
- DOWNLOAD SAMSUNG USB DRIVER V1.5.49.0 - New!
- DOWNLOAD SAMSUNG USB DRIVER V1.5.51.0 - New!
- DOWNLOAD SAMSUNG USB DRIVER V1.5.55.0 - New!
- DOWNLOAD SAMSUNG USB DRIVER V1.5.59.0 - New!
- DOWNLOAD SAMSUNG USB DRIVER V1.5.60.0 - New!
- Driver USB Samsung Galaxy Z1 v1.5.60.0
- Driver USB Samsung Z3 - New!
- Driver USB Untuk Semua Device Samsung - New!
- Samsung USB Driver Galaxy Prime
- USB Driver Samsung Galaxy Grand (i9082)
- USB Driver Samsung Galaxy S (32 bit) 1.3.450.0
- USB Driver Samsung Galaxy S Windows XP/7 64bit
- USB Driver Samsung Galaxy S (32 bit) 1.3.450.0
- USB Driver Samsung Galaxy S (64 bit) 1.3.450.0 64 bit
- USB Driver Samsung Galaxy S Win XP/Vista/7 – 32bit
- USB Driver Samsung Mobile Phone
- USB Driver Samsung SFD-321U/EP
- USB Port driver Samsung QL6100
- USB driver Samsung ML4600
Available link for download
Saturday, October 22, 2016
Fix “ This device may be associated with existing mi account Sign in to activate this device ”
Fix “ This device may be associated with existing mi account Sign in to activate this device ”
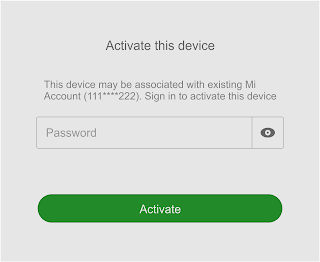 Yesterday my friend got the above warning in his Xiaomi Redmi 2 Prime. He said he did a hard reset and after boot phone stuck on the Mi Account activate screen. Unfortunately, he doesnt have a Mi account associated with the device to complete the activation.
We did a hard reset again, no luck still prompt the same warning. Found many recommendations by Googling the issue, but none worked as expected. Finally solved the issue by erase the config on fastboot mode.
Be aware that by erasing the config you may lose Browser, Chrome, Google, Google Play, etc. You need to install all of them manually.
Disclaimer - It may brick your device, Do at your risk.
Here is the complete steps …
1. Download and extract the ADB_Fastboot.zip - Download
2. Open CMD then navigate to the extracted folder (Simply open the extracted folder then shift+right click and select Open command window here)
3. Now boot your phone to fastboot mode (Volume down + Power button)
4. In fastboot mode connect the phone to computer.
5. In CMD execute the below commands in the given order
fastboot -w
fastboot erase config
fastboot reboot
Wait till the phone boots up. That’s it.
Available link for download