Showing posts with label fix. Show all posts

Saturday, March 25, 2017

Error executing updater binary in zip fix

Error executing updater binary in zip fix


Error executing updater binary in zip [fix]


fixed twrp
Many of us have their hobbies to flash different Rom(s) available one by one depending on the mood, same as I do. But recently while flashing Miui v6 on Xiaomi Redmi 1s, it gave me this
"Error executing updater binary in zip" error in the recovery while flashing as shown in the given image. Now after this error you cant boot back obviously as you wiped everything before the flashing.
Lots of people misinterprets thinking that it is encountered because of the Rom they had downloaded & flashed on their devices might be the wrong one, but its not like that. Ive seen this error mostly with the Team Win Recoveries(TWRPs) , so let me help you with this thing step by step that how you can avoid this error and get your device flashed properly.
So lets begin,

What all we need before flashing any Rom?

1. A complete nandroid backup of the Rom that was running on the device.

2. You can backup your Rom in the recovery under the backup option. It will create a backup of your whole system on your external SD card.

3. If you failed to create the backup of the Rom or you dont have the backup and the error occurred, then at least you should have the zip file of any working custom Rom of your device in the storage (external/internal).

Now lets suppose Rom1 as the stock Rom(or any working custom Rom of your device) and Rom2 will be the Rom that you flashed and got the error.

Our common steps for flashing any custom Rom(s) are,

Step 1:- Go to recovery.

Step 2:- Go to Wipe>>Advanced wipe.

Step 3:- Check data, system, cache & dalvik cache and then swipe to wipe all.

Step 4:- Then go to install zip from SD card and browse the Rom and install it.

Step 5:- Reboot the device.

Same as the above steps I flashed the Rom on the device and encountered the error in the recovery. So what I did to flash the Rom2 correctly after the error was,

Step 1:- I flashed the Rom1 again by the same methods followed above.

Step 2:- Then  without following Step 2 & Step 3 (that is not wiping the data & system from the Advanced wipe).

Step 3:- I just only did the factory reset & the dalvik cache wipe instead, from the Wipe menu.

Step 4:- After that flashed the Rom2 which gave me the updater binary error before and it got flashed completely without the error.

Step 5:- Then I rebooted the device and it booted on the system successfully.

Update: You can just only hit the "Factory Reset" before flashing the ROM to pass the error instead.
Also make sure that you are using the latest version of TWRP recovery available for your respective devices.

Thats it, if still the error stays then maybe the issue will be of the ROM only what you are flashing, but this method worked for me. As complete system wipe sometimes leads to the flashing error. Still you are getting the error again and again then stay relaxed and comment below I will work for you and find the solution for your device asap when Ill get time.

Good luck. Stay connected


Available link for download

Read more »

Thursday, March 16, 2017

Fix For Some Apps Starting Behind Focused Windows In Ubuntu Compiz

Fix For Some Apps Starting Behind Focused Windows In Ubuntu Compiz


In Ubuntu (w/ Unity), some applications/windows open behind focused windows which can be annoying in some cases. Here are a few examples:
  • clicking the "open containing folder" in the Firefox downloads menu, the file manager pops up behind the focused window;
  • activating applications through indicators doesnt always bring them to the foreground, for instance Pidgin chat windows, the file manager opened via the "Open Dropbox folder" Dropbox AppIndicator menu item, Rhythmbox from the Ubuntu Sound Menu, etc.;
  • if theres already a fileroller window open (Archive Manager, a compress/extract job, etc.), the second window you open is not focused.
I tested the examples above under Ubuntu 15.10 with Unity.

Some focus-related issues were marked as fixed a while back, but some continue to occur and there are comments, as well as bug reports, which suggest a simple solution which should fix this issue: setting "Focus Prevention level" to "Off" in CompizConfig Settings Manager (obviously you need to be using Compiz for this to work).

In case youre not aware, Ubuntu (with Unity) ships with "Focus Prevention level" set to "Low" by default. For instance, to work around this issue, Ubuntu MATE, which allows you to easily switch to Compiz via MATE Tweak, ships with this option set to "Off".

To apply the fix/workaround I mentioned above, firstly install CompizConfig Settings Manager:
sudo apt-get install compizconfig-settings-manager

Then open CompizConfig Settings Manager and under General Options > Focus & Raise Behaviour tab, set "Focus Prevention Level" to "Off":

Compiz focus prevention

Thats it! If later on you decide you want to switch back to the default behaviour, simply set the "Focus Prevention Level" back to "Low".

As a bonus, this also fixes the issue with Nemo (with Unity patches) opening in the background when theres a focused window (which I think is a bug in Nemo).


Available link for download

Read more »

Friday, March 3, 2017

Fix Failed To Fetch Google Chrome Repository After Google Dropped Support For Its Browser On Linux 32bit

Fix Failed To Fetch Google Chrome Repository After Google Dropped Support For Its Browser On Linux 32bit


As announced back in December, Google stopped supporting Google Chrome on 32-bit Linux starting this month. Users running a 32bit Linux distribution are advised to stop using Google Chrome because, while it will continue to work, it will no longer receive any updates (including no security fixes).

The 32-bit build configurations for Chromium continues to be supported, so you can still use Chromium browser on 32-bit Linux distributions.


Because the official Google Chrome repository no longer provides 32-bit packages, 64-bit Ubuntu/Debian users will notice an error when updating the software sources, which looks as follows:
Failed to fetch http://dl.google.com/linux/chrome/deb/dists/stable/Release 
Unable to find expected entry main/binary-i386/Packages in Release file (Wrong sources.list entry or malformed file)
Some index files failed to download. They have been ignored, or old ones used instead.

To fix this error on Ubuntu/Debian 64-bit, the repository must be specifically set for 64-bit only - this can be done by adding "[arch=amd64]" after "deb" in the /etc/apt/sources.list.d/google-chrome.list. To do this automatically, you can use the following command:
sudo sed -i -e s/deb http/deb [arch=amd64] http/ "/etc/apt/sources.list.d/google-chrome.list"

Update: this file is changed on each Google Chrome update and it looks like theres no way around that (changing /opt/google/chrome/cron/google-chrome or /etc/default/google-chrome doesnt affect this) so until Google changes this in its package, youll need to apply the fix above after every Google Chrome update. If you have a solution for this, let us know in the comments!

Update 2: A workaround would be to make the .list file immutable, so it cant be changed by any Google Chrome updates, by using "sudo chattr +i /etc/apt/sources.list.d/google-chrome.list" (which can be reversed using: "sudo chattr -i /etc/apt/sources.list.d/google-chrome.list") but this is not ideal and you should change this file back once Google fixes this on their end.

Update 3: this bug was fixed upstream in version 49.0.2623.87 (thanks to Segio Rus for the comment!), so updating to Google Chrome 49.0.2623.87 should fix this issue.

On 32-bit, you should remove the repository and stop using Google Chrome since it wont receive any security updates:
sudo rm /etc/apt/sources.list.d/google-chrome.list
sudo apt-get remove google-chrome


thanks to darkfur93 @ reddit for the info (and to Bruce Ingalls for the tip)


Available link for download

Read more »

Saturday, February 25, 2017

Fix Dropbox Indicator Icon And Menu Not Working In Xubuntu Lubuntu Or Ubuntu MATE

Fix Dropbox Indicator Icon And Menu Not Working In Xubuntu Lubuntu Or Ubuntu MATE


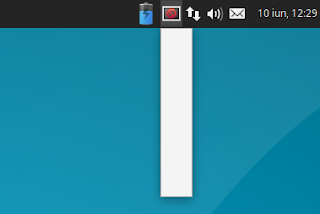
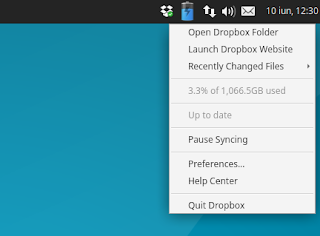
I recently stumbled on an issue with Dropbox and the Ubuntu flavors that support AppIndicators (except Unity), like Xubuntu and Lubuntu: the Dropbox AppIndicator icon shows up as broken and the menu doesnt work. This isnt a new issue though, and it seems to occur starting with Ubuntu 14.04.

The issue occurs with the Dropbox packages in the official Ubuntu repositories (called "nautilus-dropbox", which doesnt depend on Nautilus and can be used to install Dropbox on any desktop environment) as well as the Dropbox package downloaded from its official website. 

It does not occur with the caja-dropbox package available in the official Ubuntu MATE 16.04 repository though (but it does occur in older Ubuntu MATE versions if youve enabled AppIndicators), because it was patched with a fix similar to the one in this article.

Below youll find a fix / workaround for this issue. Important: using the instructions below, Dropbox will use a tray (notification area) icon instead of an AppIndicator.

Heres a screenshot with the issue (taken in Xubuntu 16.04):


And another screenshot taken after using the fix below:


Tested in Xubuntu 16.04, Xubuntu 14.04, Lubuntu 16.04, Ubuntu MATE 16.04 (the issue does not occur with the caja-dropbox package in this Ubuntu MATE version) and Ubuntu MATE 14.04.

To fix it, you need to add "dbus-launch" before the actual command for the "Exec" line in both the application autostart file and launcher. For Dropbox this is a bit tricky because it overwrites any modifications to its autostart file. So heres what you need to do to fix this Dropbox issue:
  • if youve installed Dropbox by downloading the .deb from its website or by using the nautilus-dropbox package from the repositories:
    • rename the Dropbox autostart file, located in ~/.config/autostart/, and edit the file, changing the "Exec" line to "Exec=dbus-launch dropbox start -i";
    • copy the Dropbox desktop file, located under /usr/share/applications/, to ~/.local/share/applications/, so its not overwritten when updating the package, and change the "Exec" line to "Exec=dbus-launch dropbox start -i"
    • disable the built-in Dropbox autostart (because it automatically creates an autostart file) using the "dropbox autostart n" command.
  • for the caja-dropbox package (except for Ubuntu MATE 16.04 which doesnt have this issue):
    • rename the dropbox-caja autostart file, located in ~/.config/autostart/, and edit the file, changing the "Exec" line to "Exec=dbus-launch caja-dropbox start -i";
    • copy the caja-dropbox desktop file, located under /usr/share/applications/, to ~/.local/share/applications/, so its not overwritten when updating the package, and change the "Exec" line to "Exec=dbus-launch caja-dropbox start -i";
    • disable the built-in Dropbox autostart (because it automatically creates an autostart file) using the "caja-dropbox autostart n" command.

This sounds a bit complicated on a first look, right? Well, its not, but to make it easier, you can use the following commands to apply the changes I mentioned above.

If youve installed Dropbox by downloading the .deb from its website or by using the nautilus-dropbox package, you can fix the broken Dropbox appindicator icon and menu by using the following commands:
cp ~/.config/autostart/dropbox.desktop ~/.config/autostart/start_dropbox.desktop
sed -i s/^Exec=.*/Exec=dbus-launch dropbox start -i/ ~/.config/autostart/start_dropbox.desktop
dropbox autostart n
mkdir -p ~/.local/share/applications/
cp /usr/share/applications/dropbox.desktop ~/.local/share/applications/
sed -i s/^Exec=.*/Exec=dbus-launch dropbox start -i/ ~/.local/share/applications/dropbox.desktop

For Ubuntu MATE (except 16.04), if youve used the dropbox-caja package to install Dropbox, you can fix the broken Dropbox appindicator icon and menu by using the following commands:
cp ~/.config/autostart/caja-dropbox.desktop ~/.config/autostart/start_caja-dropbox.desktop
sed -i s/^Exec=.*/Exec=dbus-launch caja-dropbox start -i/ ~/.config/autostart/start_caja-dropbox.desktop
caja-dropbox autostart n
mkdir -p ~/.local/share/applications/
cp /usr/share/applications/caja-dropbox.desktop ~/.local/share/applications/
sed -i s/^Exec=.*/Exec=dbus-launch caja-dropbox start -i/ ~/.local/share/applications/caja-dropbox.desktop

Then restart the session (logout/login) and the Dropbox icon and menu should work correctly.

via / thanks to: TuxDiary and AskUbuntu


Available link for download

Read more »

Friday, January 20, 2017

Fix Drivers Windows 7

Fix Drivers Windows 7


Software compatible with fix drivers windows 7. File is safe, passed Eset virus scan!

Driver Info:

File: fix_drivers_win_7.arj
Driver version: 2.0.8
File size: 1 359 KB
System: Win XP, Win Vista, Windows 8


Available link for download

Read more »

Tuesday, December 20, 2016

Fix Imei Null dan Invalid Dengan Restore Nvram

Fix Imei Null dan Invalid Dengan Restore Nvram


     Ini adalah salah satu dari beberapa cara mengatasi imei null dan imei invalid npada handphone android berchipset MTK dan Spreadtrum.Yaitu dengan cara write Nvram dari backupan handphone normal yang setipe,bahkan tidak menutup kemungkinan beda tipe bisa digunakan asal chipset sama misal sama sama mtk 6572 dan sebagainya.
     Semua Nvram ini hasil backup handphone normal.setiap ada backup baru akan sebisa mungkin saya upload untuk memudahkan teman teman memperbaiki masalah imei.Tentunya disarankan menggunakan Miracle Software.

Perlu diingat dalam proses ini handphone harus sudah di root.
* Acer Z120 
* Advan S5E 
* Advan S5E Pro 
* Evercoss A26C
* Evercoss A28T
* Lenovo A369i 
* Lenovo A516 
* Oppo R831K


Available link for download

Read more »

Fix Large Black Borders Around Header Bar Apps With Some Themes In Ubuntu 15 10 GTK 3 16

Fix Large Black Borders Around Header Bar Apps With Some Themes In Ubuntu 15 10 GTK 3 16


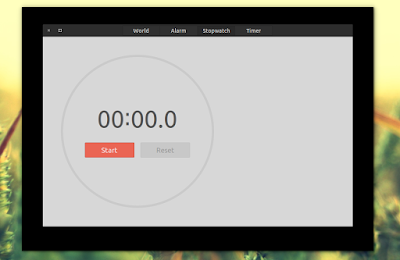
In Ubuntu 15.10 (which uses GTK 3.16), theres a bug which causes some themes, like Numix, to have large black borders.

This bug only occurs for applications that use header bars (client-side decorations) and it affects Ubuntu (with Unity), while Xubuntu, Ubuntu MATE and Ubuntu GNOME dont seem to be affected (at least in my quick test). Update: MATE with Compiz enabled is also affected so I guess any desktop environment under which you use Compiz is affected (thanks to pawelp!).

Heres a screenshot with GNOME Clocks (an app that uses header bars) under Unity (Ubuntu 15.10), using Numix GTK theme:

Ubuntu black borders bug

Im not sure when/if this bug will be fixed but until then, you can fix it yourself. Below youll find a simple fix which will remove the black borders no matter what GTK theme youre using.

To fix the large black borders bug in Ubuntu, open ~/.config/gtk-3.0/gtk.css (create the ~/.config/gtk-3.0 folder if it doesnt exist) with a text editor (Ill use Gedit below):
mkdir -p ~/.config/gtk-3.0
gedit ~/.config/gtk-3.0/gtk.css
and in this file, add the following:
.window-frame {
box-shadow: none;
margin: 1px;
}
This forces any theme you use to have a 1 pixel border. You can use any value you want - for instance, use "0" for borderless windows.

Then save the file and close all the applications affected by the black border bug (or you can log out and log back in), then try them again and you shouldnt see large black borders any more.

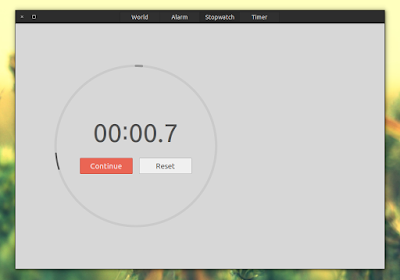
Heres the same application Ive used above to show the bug (GNOME Clocks, running under Unity), after applying the fix:


Thanks to Phaeilo @ GitHub for the fix!


Available link for download

Read more »

Sunday, December 11, 2016

fix my pc for free

fix my pc for free


Drivertuner is a technical drivers download equipment that can relieve your anxiety towards driver questions. I believe that most laptop users are not new to drivers as they play an important role in the normal working of hardware devices and the operating system or software that use it. If you want to know a proper way for solving it, then it is the right place for you.


Download the latest drivers for notebook

Keep drivers updated and away from driver questions

Optimize and speed up pc performance


Drivertuner is technical fix my pc for free that can automatically scan, detect and recommend the latest and the most suitable drivers for your computer. It is simple in operation that only need to follow three steps, and users can give a few clicks to control the whole process. Besides, it is suitable for nearly all driver categories, famous digital brands in the market and Windows OS. There is a large database in Drivertuner where stored more than ten million drivers. When you encounter with driver problems, please do not feel hesitated and find assist form Drivertuner.


Key Features


Supported Driver Types


How to update drivers?

Step one, download and install Drivertuner.

Step two, scan for needed drivers.

Step three, download and install the latest and the most suitable drivers.
links:toshiba driver download is a effective driver tool that will update your toshiba laptop drivers and other devices drivers easily. With toshiba support, there is no worry for driver problems.
With drivers download you can keep your PC running powerful with advanced system driver detach, which even deletes those files, directories and registry entries that are left behind by the normal vendor uninstallers. The plain and user friendly interface pilot you step-by-step in the eliminate of the different type of device drivers, such as sound, printer, keyboard, mouse and graphic card drivers. how to update drivers automatically updates its cleaning process by using the driver database to ensure the best possible omit of Windows equipment drivers, including unused, conflicting and unwanted drivers.
Logitech is an international market leader in appliance that connect you to digital information and the Internet, letting you work, play, learn, and communicate more efficiently in the digital world, which owns many equipment in various of fields, such as PC keyboards, mice and trackballs. logitech downloads concentrates in improve these drivers of the products. logitech drivers for windows 7 can bring up a list of all the hardware on your computer, the current driver version, and which ones have more recent versions available on line.
Being puzzled by driver issues? With hp drivers for windows 7, there is no worry for them as hewlett packard printer drivers is the best choice to maintain your notebook hp drivers and other drivers renew.
epson drivers windows 7 is specialized driver tool which is capable of advance your Epson printer drivers and other Epson appliance. This utility is capable of relieving you of worries about installing an incorrect or out-of-date driver for your pc. epson support is a definite application which is designed to search your system, download and install EPSON official drivers to let your EPSON devices work properly.


Available link for download

Read more »

Saturday, October 22, 2016

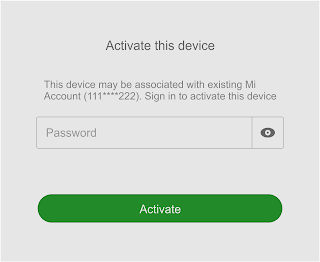
Fix “ This device may be associated with existing mi account Sign in to activate this device ”

Fix “ This device may be associated with existing mi account Sign in to activate this device ”


Yesterday my friend got the above warning in his Xiaomi Redmi 2 Prime. He said he did a hard reset and after boot phone stuck on the Mi Account activate screen. Unfortunately, he doesnt have a Mi account associated with the device to complete the activation.

We did a hard reset again, no luck still prompt the same warning. Found many recommendations by Googling the issue, but none worked as expected. Finally solved the issue by erase the config on fastboot mode.

Be aware that by erasing the config you may lose Browser, Chrome, Google, Google Play, etc. You need to install all of them manually.

Disclaimer - It may brick your device, Do at your risk.

Here is the complete steps …

1. Download and extract the ADB_Fastboot.zip - Download
2. Open CMD then navigate to the extracted folder (Simply open the extracted folder then shift+right click and select Open command window here)
3. Now boot your phone to fastboot mode (Volume down + Power button)
4. In fastboot mode connect the phone to computer.
5. In CMD execute the below commands in the given order

fastboot -w
fastboot erase config
fastboot reboot


Wait till the phone boots up. That’s it.


Available link for download

Read more »