Showing posts with label file. Show all posts

Wednesday, March 29, 2017

FREE Download DELL XPS 12 Users Guide Specifications PDF File

FREE Download DELL XPS 12 Users Guide Specifications PDF File
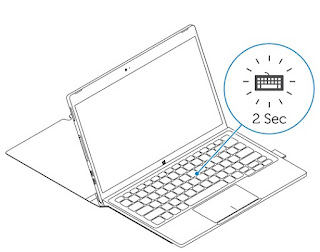

The DELL XPS 12 Users Guide has been released by asus at their website. The DELL XPS 12 Users Guide is provided in PDF document format (37-pages, PDF) that you can download directly from dell website. You can read this DELL XPS 12 Users Guide by using PDF reader software/application. The DELL XPS 12 Users Guide contains complete reference information about how to operate the DELL XPS 12 Tablet properly, such as how to use the hardware, how to charging your Tablet, docking the Tablet, Installing Sim Card, basic troubleshooting and many more.

FREE Download DELL XPS 12 Users Guide & Specifications PDF File


Table Contents:
1. Tablet features
2. Accessories
3. Setting up your tablet
4. Using your tablet
5. Entering BIOS setup program
6. Specifications
7. Troubleshooting
8. Getting help
9. Contacting Dell
10.  Locating your Service Tag and Express Service Code


Tablet Features:
DELL XPS 12 Features
1. Microphones (2). Provides sound input for audio recording, voice calls, and so on.

2. Front camera-status light. Turns on when the front camera is in use.

3. Front camera. Allows you to video chat, capture photos, and record videos.
4. Volume-control buttons (2). Press to increase or decrease the volume.

5. microSD card slot. Insert a microSD card to expand the tablet’s storage capacity. Your tablet supports a microSD card with capacity up to 128 GB.

6. Micro-SIM card slot (optional). Insert a micro-SIM card to connect to a
mobile broadband network.

7. Thunderbolt 3 ports (USB-C)/charging ports (2). Supports USB 3.1 Gen 2, DisplayPort over USB-C, and Thunderbolt 3. Provides data transfer rates up to 10 Gbps for USB 3.1 Gen 2 and up to 40 Gbps for Thunderbolt 3. Connect a power adapter to provide power to your tablet and charge the battery.

8. Headset port. Connect a headphone, a microphone, or a headphone and microphone combo (headset).

9. Microphone. Provides sound input for audio recording, voice calls, and so on.

10. Rear camera. Allows you to video chat, capture photos, and record videos.
11. Windows button.
     • Press to open the Windows Start screen.
     • Press for quick access to the most recently used app or most recently 
        used screen.

12. Tablet-docking pins. Allows docking to the keyboard dock.

13. Service Tag label. Provides the Service Tag and Express Service Code needed for contacting Dell.

14. Security-cable slot. Connects a security cable to prevent unauthorized movement of your tablet.

15. Power button.
     • Press to turn on the tablet if it is turned off or in sleep state.
     • Press to turn off the screen.


Keyboard Features:
DELL XPS 12 Keyboard Features


1. Keyboard-docking pins.
 Allows docking the tablet here.


Charging the Tablet:
1. Connect the power cable into the power adapter.
2. Connect the power adapter to the power-adapter port on the tablet.
3. Connect the power adapter to an electrical outlet and charge the tablet until the battery is fully charged.
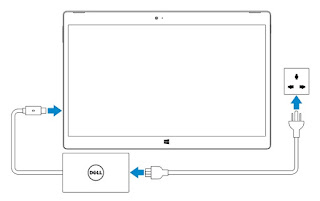
How to charging the DELL XPS 12


Turning on your tablet:
When you turn on the tablet for the first time, you must finish Windows setup to start using your tablet. For more information, see the Quick Start Guide that shipped with your tablet.
1. Press and hold the power button for 2 seconds to turn on your tablet. The lock screen appears.
2. Swipe up your finger from the bottom of the display to switch to the login
screen, and then enter password to log in to Windows.

For complete DELL XPS 12 Users Guide & Specifications PDF File , please click link below :

Download pdf file here:  
DELL XPS 12 Users Guide & Specifications.pdf


Available link for download

Read more »

Monday, March 6, 2017

Ekstrak File zip tar gz tar bz2 di Linux

Ekstrak File zip tar gz tar bz2 di Linux


Beberapa waktu lalu sudah dibahas artikel tentang jenis-jenis kompresi data. Kali ini artikelku mengenai cara mengekstrak file-file yang terkompresi (zip, tar.gz dan tar.bz2) di Linux, menggunakan command line. Kok pake command line sih? Kan susah? Kalo pake GUI nenek-nenek pun bisa.. :P

Untuk mengekstrak file zip lakukan dengan command line seperti di bawah ini:

unzip nama_file.zip

File tar.gz bisa di-ekstrak dengan menggunakan command line di bawah ini:

tar -xzf nama_file.tar.gz

bisa juga pake

tar -xvzf nama_file.tar.gz

penambahan parameter -v adalah untuk menampilkan file-file yang diekstrak.

Untuk file tar.bz2 cara mengekstraknya ga jauh beda dengan file tar.gz. Cuma beda parameter. Caranya adalah seperti di bawah ini:

tar -xjf nama_file.tar.bz2

atau

tar -xvjf nama_file.tar.bz2

Selain parameter-parameter di atas, sebenarnya masih banyak cara mengekstrak file-file tersebut. Untuk lebih lengkapnya pake command andalan, yaitu man… :D

man unzip
man tar

Selamat mencoba… :)

Sumber : http://danigunawan.com/komputer/operating-systems/ekstrak-file-zip-targz-tarbz2-di-linux/


Available link for download

Read more »

Saturday, March 4, 2017

Dual Panel File Manager Double Commander Sees New Release

Dual Panel File Manager Double Commander Sees New Release


Double Commander is a file manager that uses two side-by-side panels, available for Linux, Windows and Mac OS X. The application ships with two interfaces: GTK2 and Qt4.

Double Commander file manager Ubuntu

Started as a Sexi Commander fork and inspired by Total Commander, Double Commander has evolved over the years and it now includes numerous features, including support for WCX, WFX, WDX, WLX and DSX plugin types, tabs support, multi-rename tool, internal text editor and file viewer, archives support (allows browsing archives as if they were directories), extended search and much more.

Also, the file manager supports both horizontal and vertical dual-panel modes and is highly customizable, allowing users to change the toolbar appearance, internal commands, keyboard shortcuts and pretty much everything you can think of.

Double Commander file manager Ubuntu
New Tree View Panel in Double Commander 0.7.0

Double Commander 0.7.0 was released recently, bringing important new features, like a tree view panel, built-in GVFS support on Linux, enhanced file association dialog and more.

Important new features and changes in Double Commander 0.7.0 include:
  • tree view panel;
  • selective change attributes;
  • search in archives (wcx plugins);
  • flat view in archives (wcx plugins);
  • asymmetric directory synchronization;
  • speed up CRC32/SFV hash calculation time;
  • calculate and verify blake2s, blake2sp hash;
  • many operations can be started initially in queue;
  • enhanced file association dialog;
  • default search template;
  • built-in GVFS support (Linux);
  • copy NTFS permissions (Windows);
  • copy files between virtual file sources;
  • edit file in virtual file sources (archives, ftp etc);
  • capability to choose encoding for each ftp connection;
  • favorite Tabs: capability to save/load group of tabs.

I should also mention that all Double Commander releases have the "beta" status, and theres no "stable" release so far. Thats most probably because the main developer feels the application is not feature complete yet.

For more information, check out the Double Commander website and its online help.


Download Double Commander


Download Double Commander (source as well as binaries for Linux, FreeBSD, Mac OS X and Windows)

Theres also a Double Commander repository available for Ubuntu, Debian, openSUSE, Fedora and CentOS - you can find exact instructions for adding the repository and installing Double Commander here: GTK | Qt.


Available link for download

Read more »

Thursday, February 16, 2017

FREE DELL Inspiron 7359 2 in 1 Laptop PC Service Manual PDF File Download

FREE DELL Inspiron 7359 2 in 1 Laptop PC Service Manual PDF File Download


The DELL Inspiron 7359 2-in-1 service manual has been released by DELL at their website. The DELL Inspiron 7359 2-in-1 service manual is provided in PDF document format (94-pages) that you can download directly from DELL website. You can read this DELL Inspiron 7359 2-in-1 service manual by using PDF reader software/application. The DELL Inspiron 7359 2-in-1 service manual contains complete reference information about how to service the DELL Inspiron 7359 2-in-1 laptop PC properly, such as how to replace the keyboard, how to replace the battery, how to replace the hardrive, basic troubleshooting and many more.


Removing the base cover
Procedure
1  Close the display and turn the computer over.
2  Remove the screws that secure the base cover to the computer base.
3  Using a plastic scribe, pry the base cover away from the computer base.
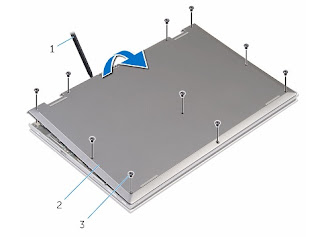
Removing the base cover


1 plastic scribe 
2 base cover
3 screw


Removing the battery
Procedure
1  Remove the screws that secure the battery to the palmrest and keyboard
assembly.
2  Remove the hard-drive cable from the routing guides on the battery.
3  Lift the battery off the palmrest and keyboard assembly.
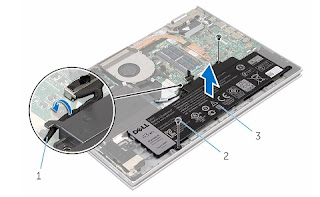


1 hard-drive cable 
2 screws (2)
3 battery


4  Turn the computer over.
5  Press and hold the power button for 5 seconds, to ground the system
board.


Removing the memory module
Procedure
1  Use your fingertips to carefully spread apart the securing-clips on each
end of the memory-module slot until the memory module pops up.
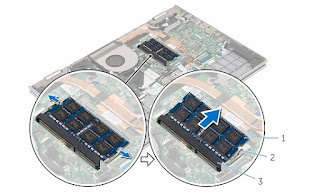
2  Remove the memory module from the memory-module slot.


1 memory module 
2 securing clips (2)
3 memory-module slot


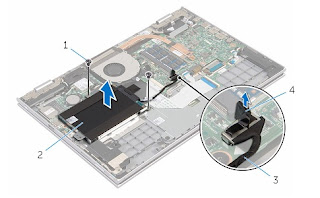
Removing the hard drive
Procedure
1  Remove the screws that secure the hard-drive assembly to the palmrest
and keyboard assembly.
2  Using the pull tab, disconnect the hard-drive cable from the system
board.
3  Lift the hard-drive assembly along with its cable off the palmrest and
keyboard assembly.


1 screws (2) 
2 hard-drive assembly
3 hard-drive cable 
4 pull tab


4  Disconnect the interposer from the hard drive.
5  Remove the screws that secure the hard-drive bracket to the hard drive.
6  Lift the hard-drive bracket from the hard drive.
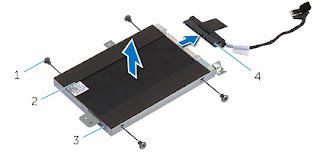
1 screws (4) 
2 hard drive
3 hard-drive bracket 
4 interposer


Removing the coin-cell battery
Procedure
Using a plastic scribe, gently pry the coin-cell battery out of the battery
socket on the I/O board.
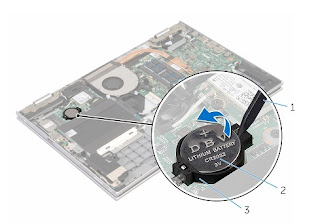

1 plastic scribe 
2 coin-cell battery
3 battery socket


The following download link is for DELL Inspiron 7359 2-in-1 Laptop PC Service Manual. The service manual is provided by Dell website. The service manual offers comprehensive information about the laptop PC that would be useful for any of you who are using this computer.

For complete DELL Inspiron 7359 2-in-1 Laptop PC Service Manual PDF File, please download here :

Download FREE DELL Inspiron 7359 2-in-1 Laptop PC Service Manual.pdf


Available link for download

Read more »

Saturday, January 21, 2017

FREE DELL Inspiron 5425 User Manual Troubleshooting Download PDF File

FREE DELL Inspiron 5425 User Manual Troubleshooting Download PDF File

The DELL Inspiron 5425 User Manual & Troubleshooting has been released by dell at their website. The DELL Inspiron 5425 User Manual & Troubleshooting is provided in PDF document format (84-pages, PDF, 3.18 MB) that you can download directly from dell website. You can read this DELL Inspiron 5425 User Manual & Troubleshooting by using PDF reader software/application. The DELL Inspiron 5425 User Manual & Troubleshooting contains complete reference information about how to operate and service the DELL Inspiron 5425 properly, such as how to replacing the switch, how to replacing the keyboard, how to replacing the memory modul, how to replacing the hardrive, how to replacing the optical drive, how to replacing the processor, basic troubleshooting and many more.

FREE DELL Inspiron 5425 User Manual & Troubleshooting Download PDF File


Table Contetns :
1. Before You Begin
2. After Working Inside Your Computer 
3. Switch
4. Battery
5. Keyboard
6. Base Cover 
7. Memory Module(s)
8. Hard Drive
9. Optical Drive
10. Palm Rest
11. Power-Adapter Port
12. Display Assembly
13. Camera Module
14. System Board
15. Thermal-Cooling Assembly
16. Processor
17. Coin-Cell Battery
18. Speakers
19. Media Card Reader
20. Daughter Board
21. Mini-Card
22. Flashing the BIOS

How to Removing & Replacing the Switch
Removing the switch :
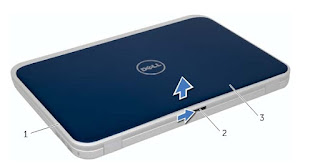
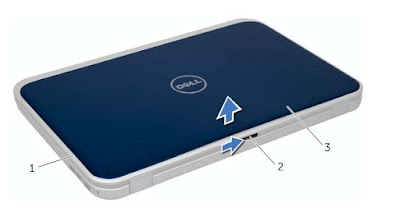
1. Slide the switch release latch to the side.The switch pops up.
2. Lift the switch off the computer.
How to Removing & Replacing the Switch DELL Inspiron 5425


1. display cover 
2. switch release latch
3. switch


Replacing the Switch :
1. Align the tabs at the bottom of the switch  with the slots on the display cover and snap the switch into place.


1. display cover 
2. slots
3. tabs 
4. switch


2. Follow the instructions in "After Work ing Inside Your Computer" on page 9.


How To Removing & Replacing the Keyboard
Removing the keyboard :
1. Turn the computer over and open the display as far as possible.
2. Using a plastic scribe, release the keyboard from the tabs on the palm rest and ease the keyboard up until it clears off the palm rest.
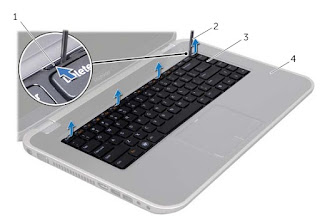
How To Removing & Replacing the Keyboard Dell Inspiron 5425


1. tabs (4) 
2. plastic scribe
3. keyboard 
4. palm rest


3. Carefully turn the keyboard over and place it on the palm rest.
4. Lift the connector latch and pull the pull- tab to disconnect the keyboard cable from the connector on the system board.
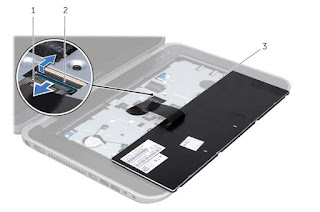
5. Lift the keyboard away from the computer.
How To Removing & Replacing the Keyboard Dell Inspiron 5425


1. keyboard cable 
2. connector latch
3. tabs (5)


Replacing the Keyboard:
1. Slide the keyboard cable into the connecto r on the system board and press down on the connector latch to secure the cable.
2. Slide the tabs at the bottom of the keyboard into the slots on the palm rest and place the keyboard on the palm rest.
3. Gently press around the edges of the keyboard to secure the keyboard under the tabs on the palm rest.
4. Close the display and turn the computer over.


For Complete DELL Inspiron 5425 User Manual & Troubleshooting pdf file, please click link below :

Download pdf file : DELL Inspiron 5425 User Manual & Troubleshooting.pdf


Available link for download

Read more »

Monday, November 28, 2016

File ISO dan Virtual Drive

File ISO dan Virtual Drive

File ISO dan Virtual Drive
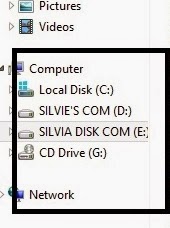
Pernahkah anda mencoba menginstal sebuah game dimana setelah proses penginstalan game tersebut, anda tidak dapat langsung memainkan game tersebut karena meminta anda untuk selalu menggunakan CD instalannya agar bisa memainkan game tsb. Nah untuk mengatasi hal tersebut kita harus mempunyai virtual drive, yaitu software yang digunakan untuk mengolah file iso, jadi kita bisa menambah drive tambahan pada komputer sebagai pengganti drive DVD / CD Room , jadi jika anda memiliki 1 DVD Room maka dengan software ini anda seolah-olah memiliki 1 lagi drive DVD ROOM tetapi dengan syarat tipe file nya harus.iso ... untuk membuat file iso ini dan bisa menambah drive DVD ROOM tambahan maka kita harus memiliki software yang bernama "POWER ISO" sebenarnya masih banyak software-software virtual drive lainnya seperti ULTRA ISO dll, tetapi disini saya menggunakan ultra iso untuk membuat file iso dan menambah drive. Pertama-tama silahkan download file POWER ISO nya DISINI, Setelah di download anda bisa langsung instal file POWER ISO nya, maka di komputer anda akan otomatis ada drive tambahan dari power iso seperti berikut ini :

Bisa dilihat di gambar akan ada tambahan drive berupa CD Drive (G)

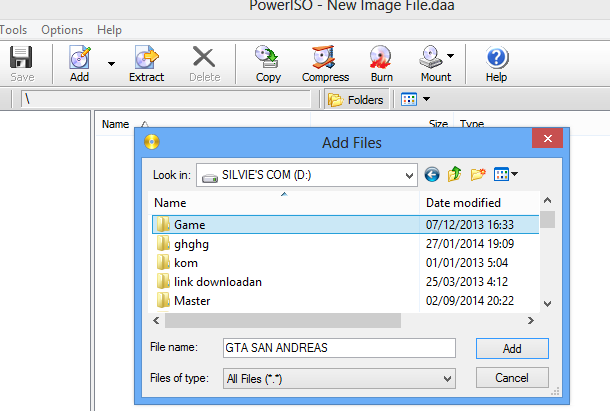
Langkah selanjutnya jika anda bertujuan agar bisa menjalankan CD / DVD game anda tanpa harus memasang CD asli game tersebut, maka yang harus anda lakukan adalah convert dulu file game tersebut menjadi file iso dengan ekstension .iso, dengan cara :

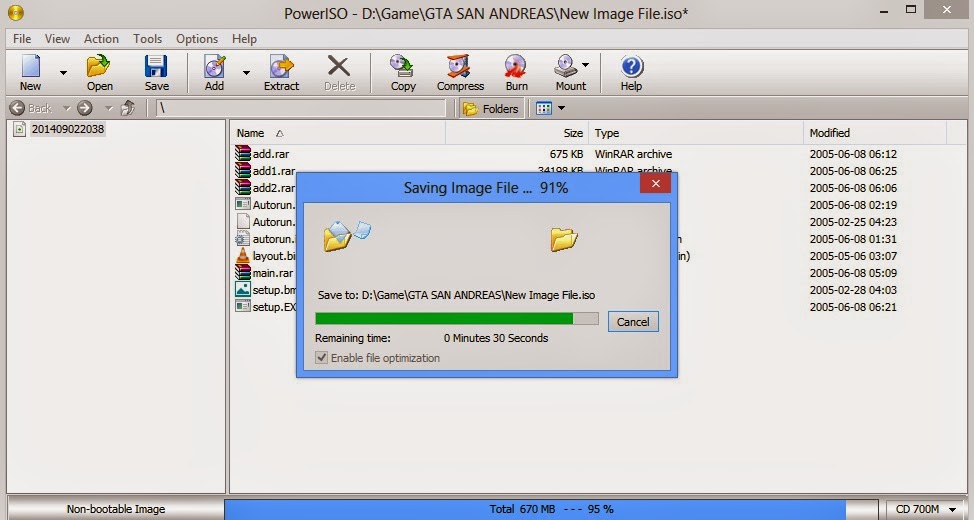
1. Buka program Power Iso yang sudah di instal tadi lalu, langsung klik Add pada toolbar power iso tersebut , lalu akan muncul kotak add files , pada kotak Look In cari folder game yang anda inginkan lalu klik add lalu seleksi semua file yang ada di folder tersebut


2. Setelah semuanya terseleksi, lalu pilih menu file lalu klik save-as , prosesnya sama seperti proses menyimpan data pada dokumen lainnya, tetapi pada kotak Save-As Type jangan  lupa rubah type file nya menjadi .ISO lalu klik save


3. Maka proses penyimpanan file dengan format iso pun dimulai kita tinggal menunggu proses penyimpanan tersebut sampai selesai


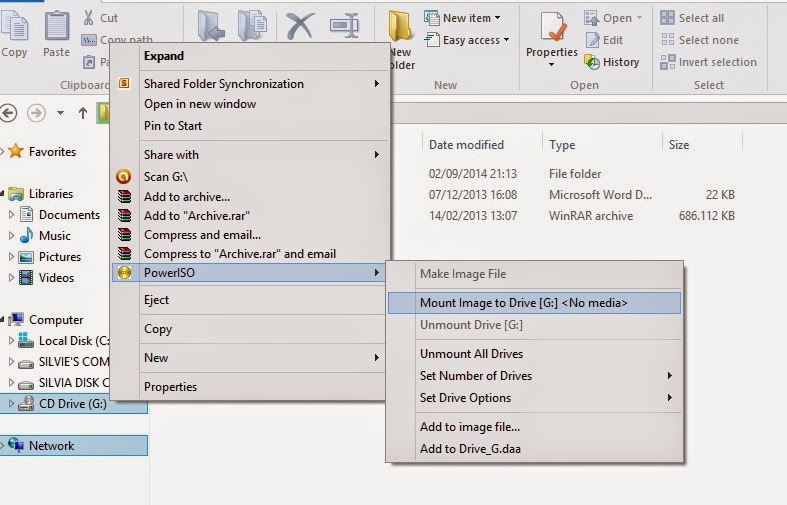
4. Nah sekarang file iso nya sudah ada, langkah selanjutnya adalah proses mount, yaitu proses memasukan file iso tersebut ke Drive tambahan pada komputer , dengan cara :
- Klik kanan pada drive tambahan , lalu pilih power iso dan pilih mount image to drive
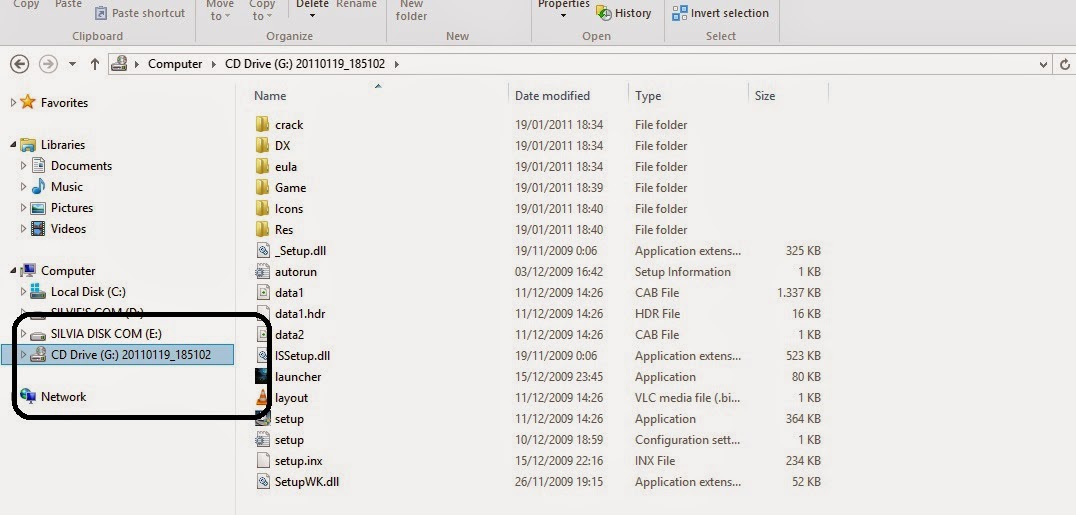
5. Akan muncul kotak dialog open dimana kita harus memasukan lokasi dimana file iso itu berada, lalu , klik open dan hasilnya adalah sebagai berikut :
6. Setelah tampilan seperti itu maka kita telah berhasil membuat drive tambahan dengan software virtual drive Power Iso, anda dapat menggunakan sofware lain untuk melakukan penambahan dive, silahkan anda mengkreasikan sendiri karena prosesnya hampir sama

Dengan  ini , maka anda yang tadinya tidak bisa memainkan game dengan tanpa CD/DVD aslinya, maka anda sekarang bisa memainkan game dengan mudah hanya dengan menggunakan tambahan drive seolah kita mempunyai drive DVD lebih dari satu. Sekian untuk tips menggunakan software virtual drive, semoga bermanfaat ^_^


File ISO dan Virtual Drive
Sumber


Available link for download

Read more »

Sunday, November 27, 2016

File Uploaded

File Uploaded


THE FILE WILL UPLOADED TIME BY TIME
NOT ALL FIRMWARE ARE COMPATIBLE TO YOUR DEVICE
(Last Update: 02 MAR 2016)

DZ09 Firmware

  1. 20150604
  2. 20150605
  3. 20150611
  4. 20150624
  5. 20150629
  6. 20150703
  7. 20150704
  8. 20150720
  9. 20150902
  10. 20150906
  11. 20150909
  12. 20150922
  13. 20151009
  14. 20151009(multi-language)
  15. 20151015 (English)
  16. 20151015(Multi-language)
  17. 20151016(english)
  18. 20151019
  19. 20151021(multilanguage)
  20. 20151029(multilanguage)
  21. 20151104(apple-ui-chinese)
  22. 20151113(multi-languange) 
  23. 20151119(multi-languange-JD-9031)
  24. 20151120(multilang+netherland-jd-9031)
  25. 20151120(multilang+burmese+kulala)
  26. 20151120(multilang+netherlands)JD-9031 -Latest Uploaded
  27. 20151124(multi-lang)SW07 -Latest Uploaded
  28. ....uploaded soon

GT08 Firmware

  1. 20151026
  2. 20151106(Chinese Version)
  3. 20151106last(Chinese Version)
  4. 20151121(multi-lang+netherlans)JD-9001 -Latest Uploaded
  5. 20151121_last(multi-lang+netherlands)JD-9001 -Latest Uploaded
  6. ....uploaded soon

W02 Firmware

  1. 20151028
  2. 20151030(Multi-language)
  3. 20151102(multi-language)
  4. 20151104(apple ui chinese)

GV08 Firmware

  1. 20151107(Multi-language)
  2. 20151110(Multi-language Hashkey)
  3. ....uploaded soon

A03 Firmware

  1. 20151124(W155)
  2. 20151125(multi-lang)-B1 -Latest Uploaded
  3. 20151125(multi-lang)BSNL_W-155 -Latest Uploaded
  4. ....uploaded soon


Available link for download

Read more »

Thursday, October 20, 2016

Free Download DELL Alienware Aurora R4 Owners Manual PDF File

Free Download DELL Alienware Aurora R4 Owners Manual PDF File
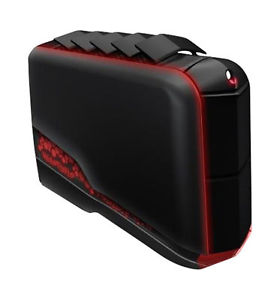

The DELL Alienware Aurora-R4 Owners Manual has been released by dell at their website. The DELL Alienware Aurora-R4 Owners Manual is provided in PDF document format (162-pages, PDF, 5.32 MB) that you can download directly from dell website. You can read this DELL Alienware Aurora-R4 Owners Manual by using PDF reader software/application. The DELL Alienware Aurora-R4 Owners Manual contains complete reference information about DELL Alienware Aurora-R4 specification and how to operate and service the DELL Alienware Aurora-R4 computer properly, such as how to use the hardware, how to replacing the hard drive, how to replacing the optical drive, how to replacing the processor, basic troubleshooting and many more.

Free Download DELL Alienware Aurora-R4 Owners Manual PDF File

Table Contents:
1. Before You Begin
2. After Working Inside Your Computer
3. Technical Overview
4. Left Side-Panel
5. Hard Drive(s)
6. Hard-Drive Fan Assembly
7. Optical Drive(s)
8. Media-Card Reader
9. PCI Shroud
10. Drive-Bay Shroud
11. PCI-Express x1 Card
12. PCI-Fan
13. Graphics Card
14. Memory Module(s)
15. Memory Fan
16. Processor Liquid-Cooling Assembly 
17. Processor
18. Power-Supply Unit
19. Coin-Cell Battery
20. Theater-Lighting Batteries (ALX Chassis Only)
21. System-Board Assembly
22. Master I/O Board
23. Top Lighting-Board
24. Right-Side Top Panel
25. Right-Side Middle Panel 
26. Right Lighting-Board
27. Right-Side Bottom Panel
28. Top Vent
29. Front Bezel
30. Back Bezel
31. WiFi/Bluetooth Assembly
32. Top I/O Panel
33. System Setup
34. Flashing the BIOS
35. Specifications

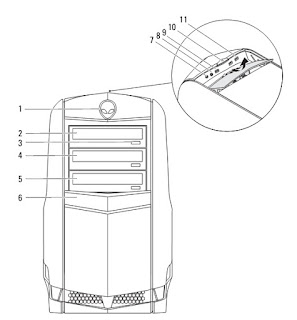
Front View of DELL Alienware Aurora-R4:
Front View of DELL Alienware Aurora-R4

1. AlienHead/drive-panel open button 
2. optical drive
3. optical-drive eject button 
4. optical-drive bay
5. media-card reader/optical-drive bay 
6. drive panel (open)
7. headphone connector 
8. microphone connector
9. USB 3.0 connector 
10. power button
11. USB 2.0 connectors (2)


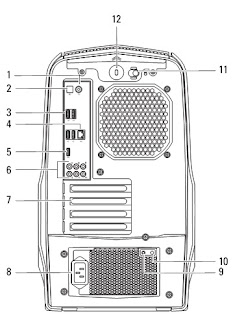
Back View of DELL Alienware Aurora-R4:
Back View of DELL Alienware Aurora-R4


1. coaxial S/PDIF connector 
2. optical S/PDIF connector
3. USB 2.0 connectors (4) 
4. network connector and network lights
5. USB 3.0 connector 
6. audio connectors
7. expansion-card slots 
8. power connector
9. power-supply diagnostics button 
10. power-supply diagnostics light
11. security-cable slot latch 
12. security-cable slot


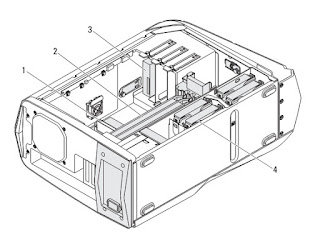
Inside View of DELL Alienware Aurora-R4:
Inside View of DELL Alienware Aurora-R4


1. memory module(s) 
2. PCI-Express card(s)
3. optical drive(s) 
4. hard-drive(s)


System-Board of DELL Alienware Aurora-R4:

1. heat-sink fan connector SYS_FAN1)
2. memory-module connector (DIMM1)
3. memory-module connector (DIMM2)
4. processor power connector (PWR2)
5. processor socket (CPU1) 
6. memory-module connector (DIMM4)
7. memory-module connector (DIMM3)
8. processor fan connector (CPU_FAN)
9. main power connector (PWR1) 
10. front USB connector (FUSB3_0)
11. heat-sink fan connector (SYS_FAN2)
12. battery socket (BAT1)
13. CMOS jumper (CLEAR_CMOS) 
14. serial ATA drive connectors (SATA1_2)
15. serial ATA drive connectors (SATA3_4)
16. serial ATA drive connectors (SATA5_6)
17. password jumper (PASSWORD) 
18. front panel connector (FRONT_PANEL)
19. USB connector (USB1) 
20. USB connector (USB2)
21. USB connector (USB3) 
22. Low pin count debug header (LPC)
23. front audio connector (FRONT_AUDIO)
24. PCI-Express x1 connector (SLOT4)
25. PCI-Express x16 connector (SLOT3)
26. PCI-Express x1 connector (SLOT2)
27. PCI-Express x16 connector (SLOT1)

For DELL Alienware Aurora-R4 complete owners manual pdf file , please click link bellow :
Download pdf file :  DELL Alienware Aurora-R4 Owners Manual.pdf


Available link for download

Read more »

Monday, October 10, 2016

File C Dell Drivers R58182 Readme Htm

File C Dell Drivers R58182 Readme Htm


Here you can download file: c: dell drivers r58182 readme.htm for Windows. Its 100% safe, uploaded from safe source and passed G Data virus scan!

Driver Info:

File name: file:-c:-dell_drv-r58182-readme.htm.zip
Driver version: 2.3.4
File size: 1 994 KB
OS: Windows 7, Win Vista, Win XP
Upload source: manufactuter website


Available link for download

Read more »