Showing posts with label manual. Show all posts
Showing posts with label manual. Show all posts
Wednesday, March 29, 2017
FREE ASUS Zenbook Pro User Guide E Manual PDF Download
FREE ASUS Zenbook Pro User Guide E Manual PDF Download
The ASUS Zenbook Pro manual user guide & troubleshooting has been released by asus at their website. The ASUS Zenbook Pro user guide is provided in PDF document format (106-pages, PDF, 5.64 MB) that you can download directly from asus website. You can read this ASUS Zenbook Pro user manual by using PDF reader software/application. The ASUS Zenbook Pro manual contains complete reference information about how to operate the ASUS Zenbook Pro Notebook properly, such as how to use the hardware, how to secure your Notebook, protecting data against viruses, Installing or replacing hardware, creating and using recovery media, basic troubleshooting and many more.
The ASUS Zenbook Pro boasts Intel® Core™ i7 6700HQ Processor with Genuine Windows 10 Home and Pro operating system. The ASUS Zenbook Pro comes with Intel® HM170 Chipset, up to 16GB DDR4 SDRAM, NVIDIA® GeForce® GTX 960M with 2G/4G GDDR5 VRAM.
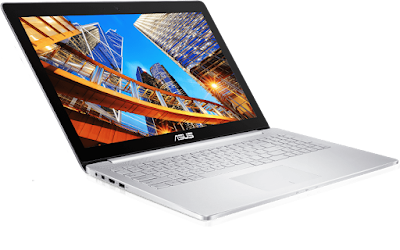
Table of Contetns
- Chapter 1: Hardware Setup
- Chapter 2: Using your Notebook PC
- Chapter 3: Working with Windows 10
- Chapter 4: Power-On Self-Test (POST)
- Tips and FAQs
- Appendices
Getting to know your Notebook PC
Top View

1. Array microphone
2. Camera
3. Camera indicator
4. Display panel
5. Keyboard
6. Touchpad
7. Power button
8. Numeric keypad
Bottom View

1. Air vents
2. Audio speakers
Right Side View

- Headphone/Headset,Microphone jack
- Memory card reader
- USB 3.0 port
Left Side View

1. Power (DC) input port
2. USB 3.0 port with USB Charger+
3. HDMI Port
4. USB Type-C/Thunderbolt/DisplayPort combo port
To get the complete user guide-manual, please download the pdf file.
The following download link is ASUS Zenbook Pro user guide manual. The manual is provided by asus website. The manual offers comprehensive information about the Notebook PC that would be useful for any of you who are using this computer.
Download FREE: ASUS Zenbook Pro user guide e-manual.pdf
Available link for download

Saturday, March 4, 2017
FREE PDF HUAWEI NEXUS P6 User Manual PDF Free Download
FREE PDF HUAWEI NEXUS P6 User Manual PDF Free Download
HUAWEI NEXUS P6 User Manual PDF Free Download.
Are you looking for Huwawei Nexus P6 user manual / guide? Here is Huwawei Nexus P6 user manual you have to read before operating the Huwawei Nexus P6 audio player, so you can use it correctly. Huwawei Nexus P6 user manual is now available online and you can download it directly from Huwawei website. This manual comes in 12 pages of PDF document format (394 Kb).

Table of Content HUAWEI NEXUS P6 User Manual
1. Nexus hardware
2. Change call settings
3. Set your default messaging app
4. Save battery life with temporary changes
5. Take a screenshot
6. Use Gesture Typing
7. Find & delete downloads
8. Check battery level
HUAWEI NEXUS P6 Hardware

1. Front-facing camera
2. Headset jack
3. Earpiece & speaker
4. Power button
5. Volume buttons
6. Speaker
7. USB Type-C port
8. Rear-facing camera
9. Flash
10. NFC
11. SIM card tray
12. Nexus Imprint sensor
How to Change call settings
You can change things like your ringtone, voicemail, and call forwarding on your phone. To change call settings, follow these steps:
1. Open your devices Phone app
2. Touch the menu icon .
3. Touch Settings > Calls.
4.
Read more »
Available link for download
Monday, February 20, 2017
FREE Dell Latitude 10 – ST2e Owners Manual PDF Download
FREE Dell Latitude 10 – ST2e Owners Manual PDF Download
The Dell Latitude 10 – ST2e manual user guide & troubleshooting has been released by DELL at their website. The Dell Latitude 10 – ST2e user guide is provided in PDF document format (37-pages, PDF, 2.9 MB) that you can download directly from dell website. You can read this Dell Latitude 10 – ST2e user manual by using PDF reader software/application. The Dell Latitude 10 – ST2e manual contains complete reference information about how to operate the Dell Latitude 10 – ST2e Tablet properly, basic troubleshooting, specifications and many more.
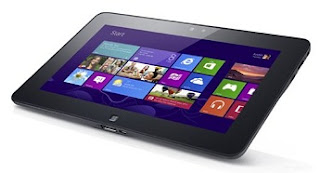
Table of Contents :
1. Working on Your Computer
2. Removing and Installing Components
3. System Setup
4. Troubleshooting Your Computer
5. Specifications
6. Contacting Dell
Internal View:
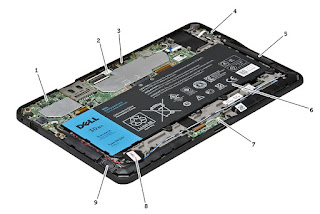
1. system board
2. front camera
3. rear camera
4. battery
2. front camera
3. rear camera
4. battery
5. volume button
6. speaker
7. battery
8. docking board
9. coin-cell battery
10. speaker
6. speaker
7. battery
8. docking board
9. coin-cell battery
10. speaker
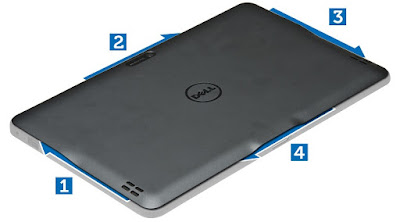
Removing the Base Cover:
1. Follow the procedures in Before Working Inside Your Computer.
2. Pry and lift the base cover from the computer by following the arrow sequence in the diagram.
2. Pry and lift the base cover from the computer by following the arrow sequence in the diagram.
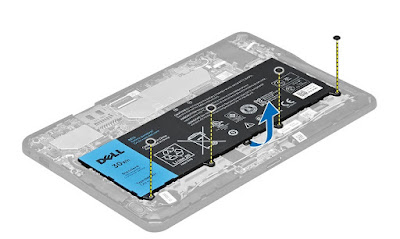
Removing the Battery:
1. Follow the procedures in Before Working Inside Your Computer.
2. Remove the base cover.
3. Remove the screws that secure the battery to the computer and lift the battery from the computer.
2. Remove the base cover.
3. Remove the screws that secure the battery to the computer and lift the battery from the computer.
Removing the Front Camera:
1. Follow the procedures in Before Working Inside Your Computer.
2. Remove the:
a) base cover
b) battery
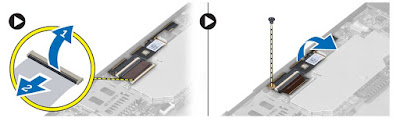
3. Lift up the connector latch and disconnect the camera cable. Remove the screw that secures the camera module to the computer. Remove the camera module from the computer.
2. Remove the:
a) base cover
b) battery
3. Lift up the connector latch and disconnect the camera cable. Remove the screw that secures the camera module to the computer. Remove the camera module from the computer.
Removing the Speakers:
1. Follow the procedures in Before Working Inside Your Computer.
2. Remove the :
a) base cover
b) battery
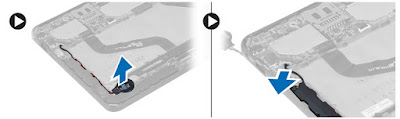
3. Lift up the coin-cell battery from its slot and un-route its cabling from below the speaker. Disconnect the speaker connector from the system board.
2. Remove the :
a) base cover
b) battery
3. Lift up the coin-cell battery from its slot and un-route its cabling from below the speaker. Disconnect the speaker connector from the system board.
4. Remove the screws that secure the speakers to the computer.
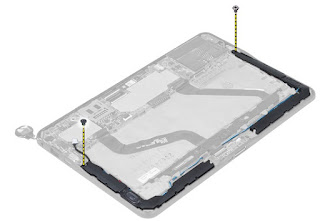
5. Un-route the speaker cable on the side of the computer and lift it up to release the speaker from the computer.
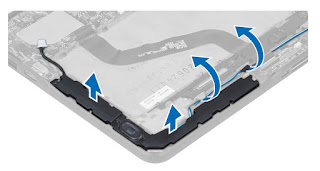
6. Un-route the speaker cable on the side of the computer and lift it up to release the speaker from the computer.
Removing the System Board:
1. Follow the procedures in Before Working Inside Your Computer.
2. Remove the:
a) base cover
b) battery
c) speaker
d) front camera
e) docking board
3. Disconnect the LVDS and docking board cables.
4. Remove the screws that secure the system board to the computer
2. Remove the:
a) base cover
b) battery
c) speaker
d) front camera
e) docking board
3. Disconnect the LVDS and docking board cables.
4. Remove the screws that secure the system board to the computer
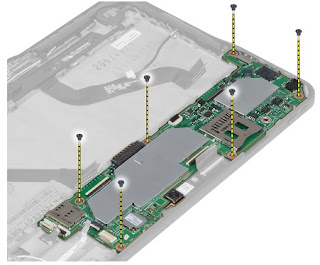
5. Lift up the system board at a 45° angle and pull it away from the computer.
Download FREE Dell Latitude 10 – ST2e Owners Manual PDF here :
Dell Latitude 10 – ST2e Owners Manual.pdf
Available link for download
Friday, February 17, 2017
Free PDF Sony Xperia ™ M4 Aqua User Manual Troubleshooting PDF Download
Free PDF Sony Xperia ™ M4 Aqua User Manual Troubleshooting PDF Download
Are you a Sony Xperia ™ M4 Aqua owner? Here is Sony Xperia ™ M4 Aqua user manual & troubleshooting for you. This manual is available online and you can download it directly from sony.com. This manual comes in 128 pages of PDF document format (1.4 MB). This Sony Xperia ™ M4 Aqua user manual & troubleshooting contains any information and instructions how to operate the Sony Xperia ™ M4 Aqua properly, such as install the SIM or USIM card and battery, charge the battery, insert / remove / format a memory card (optional), turn your device on and off, use the S Pen and the touch screen, get to know the idle screen, use the notifications panel, access applications, customise your device, using special features, use calling functions, create and send text (SMS) or multimedia (MMS) messages, Google Mail service information, using & settings the camera, edit photo or video, personal information, browse the web, troubleshooting and many more.
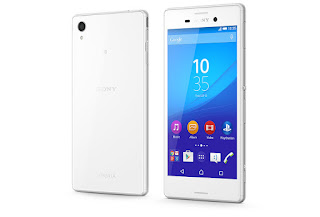
Table Contents of Sony Xperia ™ M4 Aqua User Manual & Troubleshooting
- Getting started
- Learning the basics
- Downloading applications
- Internet and networks
- Synchronising data on your device
- Basic settings
- Typing text
- Calling
- Contacts
- Messaging and chat
- Music
- FM radio
- Camera
- Photos and videos in Album
- Videos
- Connectivity
- Smart apps and features that save you time
- Travel and maps
- Calendar and alarm clock
- Support and maintenance
About this User Guide
This is the Xperia™ M4 Aqua User guide for the Android™ 5.0 software version. If youre not sure which software version your device is running, you can check it via the Settings menu. For more information about software updates, see Updating your device on page 118 .
Sony Xperia ™ M4 Aqua Device Layout


1. Charging/Notification light
2. Proximity/Light sensor
3. Ear speaker
4. Front camera lens
5. Nano SIM card slot cover
6. Power key
7. Volume/Zoom key
8. Camera key
9. Loudspeaker
10. Main microphone
11. Main camera lens
12. Camera light
13. GPS antenna area
14. NFC™ detection area
15. Headset jack
16. Second microphone
17. Charger/USB cable port
18. Wi-Fi/Bluetooth antenna area
19. Memory card slot cover
2. Proximity/Light sensor
3. Ear speaker
4. Front camera lens
5. Nano SIM card slot cover
6. Power key
7. Volume/Zoom key
8. Camera key
9. Loudspeaker
10. Main microphone
11. Main camera lens
12. Camera light
13. GPS antenna area
14. NFC™ detection area
15. Headset jack
16. Second microphone
17. Charger/USB cable port
18. Wi-Fi/Bluetooth antenna area
19. Memory card slot cover
How to insert the nano SIM card
To prevent damage to your device, do not insert a nano SIM card that has been directly cut from a USIM card.
1. Detach the nano SIM card slot cover.
2. Insert the nano SIM card into the nano SIM card slot.
3. Re-attach the cover.
2. Insert the nano SIM card into the nano SIM card slot.
3. Re-attach the cover.
How to Insert the Memory Card
1. Detach the memory card slot cover.
2. With the gold coloured contacts facing down, insert the memory card into the memory card slot, then re-attach the memory card slot cover.
2. With the gold coloured contacts facing down, insert the memory card into the memory card slot, then re-attach the memory card slot cover.
How to Remove tbe SIM Card
1. Detach the nano SIM card slot cover.
2. Press the nano SIM card inwards until it makes a clicking sound and then release it immediately.
3. Draw the nano SIM card fully outwards and remove it.
4. Re-attach the cover.
2. Press the nano SIM card inwards until it makes a clicking sound and then release it immediately.
3. Draw the nano SIM card fully outwards and remove it.
4. Re-attach the cover.

How to Turn On The SONY Xperia M4 Aqua Device
Make sure that the battery is charged for at least 30 minutes before you turn on the device for
the first time.
the first time.
1. Press and hold down the power key until the device vibrates.
2. Enter your SIM card PIN when requested, then tap .
3. Wait a while for the device to start.
2. Enter your SIM card PIN when requested, then tap .
3. Wait a while for the device to start.

How to Turn Off The Device
1 Press and hold down the power key until the options menu opens.
2 In the options menu, tap Power off.
1 Press and hold down the power key until the options menu opens.
2 In the options menu, tap Power off.
How to Charging the Sony Xperia ™ M4 Aqua
Your device has an embedded, rechargeable battery that should be replaced only by Sony or an authorised Sony repair centre. You should never try to open or take apart the device yourself. Opening the device can cause damage that voids your warranty.
The battery is partly charged when the device is shipped from the factory. Depending on how long your device was in the box before you purchased it, the battery level may be quite low. It is therefore recommended that you charge the battery for at least 30 minutes before starting up your device for the first time. You can still use your device while it is charging. To read more about how to improve the battery performance, see Battery and power management on page 120 .
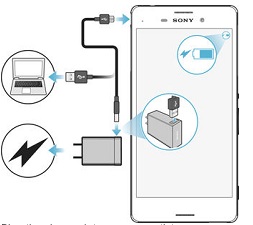
1. Plug the charger into a power outlet.
2. Plug one end of the USB cable into the charger (or into the USB port of a computer).
3. Plug the other end of the cable into the micro USB port on your device, with the USB symbol facing up. The notification light illuminates when charging begins.
4. When the device is fully charged, disconnect the cable from your device by pulling it straight outwards. Make sure not to bend the connector.
2. Plug one end of the USB cable into the charger (or into the USB port of a computer).
3. Plug the other end of the cable into the micro USB port on your device, with the USB symbol facing up. The notification light illuminates when charging begins.
4. When the device is fully charged, disconnect the cable from your device by pulling it straight outwards. Make sure not to bend the connector.
Are you looking for Sony Xperia ™ M4 Aqua user guide & instructions? Here is Sony Xperia ™ M4 Aqua user guide / owner manual you have to read before operating the Sony Xperia ™ M4 Aqua, so you can use it correctly. Sony Xperia ™ M4 Aqua user guide is now available online and you can download it directly from SONY website. This manual comes in 128 pages of PDF document format (1.4 MB).
The following download link is for Sony Xperia ™ M4 Aqua user guide manual. The manual is provided by SONY website. The manual offers comprehensive information about the phone that would be useful for any of you who are using this mobile phone.
Download FREE Sony Xperia ™ M4 Aqua user guide & setting instruction.pdf
The following download link is for Sony Xperia ™ M4 Aqua user guide manual. The manual is provided by SONY website. The manual offers comprehensive information about the phone that would be useful for any of you who are using this mobile phone.
Download FREE Sony Xperia ™ M4 Aqua user guide & setting instruction.pdf
Available link for download
Thursday, February 16, 2017
FREE DELL Inspiron 7359 2 in 1 Laptop PC Service Manual PDF File Download
FREE DELL Inspiron 7359 2 in 1 Laptop PC Service Manual PDF File Download
The DELL Inspiron 7359 2-in-1 service manual has been released by DELL at their website. The DELL Inspiron 7359 2-in-1 service manual is provided in PDF document format (94-pages) that you can download directly from DELL website. You can read this DELL Inspiron 7359 2-in-1 service manual by using PDF reader software/application. The DELL Inspiron 7359 2-in-1 service manual contains complete reference information about how to service the DELL Inspiron 7359 2-in-1 laptop PC properly, such as how to replace the keyboard, how to replace the battery, how to replace the hardrive, basic troubleshooting and many more.

Removing the base cover
Procedure
1 Close the display and turn the computer over.
2 Remove the screws that secure the base cover to the computer base.
3 Using a plastic scribe, pry the base cover away from the computer base.
1 Close the display and turn the computer over.
2 Remove the screws that secure the base cover to the computer base.
3 Using a plastic scribe, pry the base cover away from the computer base.
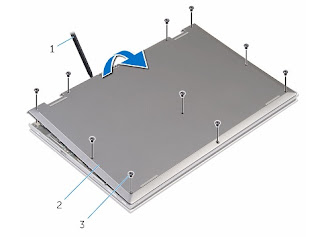
1 plastic scribe
2 base cover
3 screw
3 screw
Removing the battery
Procedure
1 Remove the screws that secure the battery to the palmrest and keyboard
assembly.
2 Remove the hard-drive cable from the routing guides on the battery.
3 Lift the battery off the palmrest and keyboard assembly.
1 Remove the screws that secure the battery to the palmrest and keyboard
assembly.
2 Remove the hard-drive cable from the routing guides on the battery.
3 Lift the battery off the palmrest and keyboard assembly.
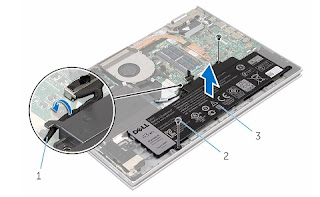
1 hard-drive cable
2 screws (2)
3 battery
3 battery
4 Turn the computer over.
5 Press and hold the power button for 5 seconds, to ground the system
board.
5 Press and hold the power button for 5 seconds, to ground the system
board.
Removing the memory module
Procedure
1 Use your fingertips to carefully spread apart the securing-clips on each
end of the memory-module slot until the memory module pops up.
1 Use your fingertips to carefully spread apart the securing-clips on each
end of the memory-module slot until the memory module pops up.
2 Remove the memory module from the memory-module slot.
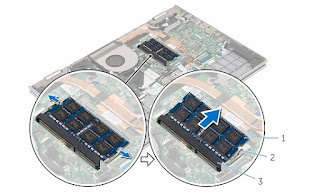
1 memory module
2 securing clips (2)
3 memory-module slot
3 memory-module slot
Removing the hard drive
Procedure
1 Remove the screws that secure the hard-drive assembly to the palmrest
and keyboard assembly.
2 Using the pull tab, disconnect the hard-drive cable from the system
board.
1 Remove the screws that secure the hard-drive assembly to the palmrest
and keyboard assembly.
2 Using the pull tab, disconnect the hard-drive cable from the system
board.
3 Lift the hard-drive assembly along with its cable off the palmrest and
keyboard assembly.
keyboard assembly.
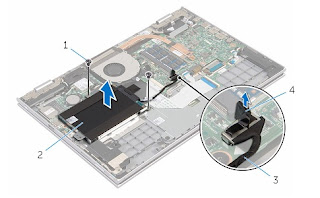
1 screws (2)
2 hard-drive assembly
3 hard-drive cable
3 hard-drive cable
4 pull tab
4 Disconnect the interposer from the hard drive.
5 Remove the screws that secure the hard-drive bracket to the hard drive.
6 Lift the hard-drive bracket from the hard drive.
5 Remove the screws that secure the hard-drive bracket to the hard drive.
6 Lift the hard-drive bracket from the hard drive.
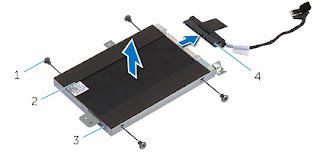
1 screws (4)
2 hard drive
3 hard-drive bracket
3 hard-drive bracket
4 interposer
Removing the coin-cell battery
Procedure
Using a plastic scribe, gently pry the coin-cell battery out of the battery
socket on the I/O board.
Using a plastic scribe, gently pry the coin-cell battery out of the battery
socket on the I/O board.
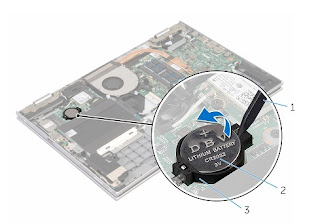
1 plastic scribe
2 coin-cell battery
3 battery socket
3 battery socket
The following download link is for DELL Inspiron 7359 2-in-1 Laptop PC Service Manual. The service manual is provided by Dell website. The service manual offers comprehensive information about the laptop PC that would be useful for any of you who are using this computer.
For complete DELL Inspiron 7359 2-in-1 Laptop PC Service Manual PDF File, please download here :
Download FREE DELL Inspiron 7359 2-in-1 Laptop PC Service Manual.pdf
Available link for download
Tuesday, January 24, 2017
FREE DELL Inspiron 15 5559 Service Manual and Specification PDF Download
FREE DELL Inspiron 15 5559 Service Manual and Specification PDF Download
Are you a DELL Inspiron 15 5559 owner? Here is DELL Inspiron 15 5559 service manual and specification for you. This DELL Inspiron 15 5559 service manual is available online and you can download it directly from DELL website. This service manual comes in 100 pages and specification comes in 23 pages of PDF document format. This DELL Inspiron 15 5559 service manual any information and instructions how to service the DELL Inspiron 15 5559.
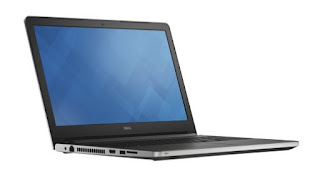
Table Contents of Service Manual DELL Inspiron 15 5559:
1. Before working inside your computer
2. After working inside your computer
3. Removing the battery
4. Replacing the battery
5. Removing the optical drive
6. Replacing the optical drive
7. Removing the base cover
8. Replacing the base cover
9. Removing the memory modules
10. Replacing the memory modules
11. Removing the hard drive
12. Replacing the hard drive
13. Removing the wireless card
14. Replacing the wireless card
15. Removing the coin-cell battery
16. Replacing the coin-cell battery
17. Removing the keyboard
18. Replacing the keyboard
19. Removing the computer base
20. Replacing the computer base
21. Removing the optical-drive interposer
22. Replacing the optical-drive interposer
23. Removing the speakers
24. Replacing the speakers
25. Removing the I/O board
26. Replacing the I/O board
27. Removing the heat-sink assembly
28. Replacing the heat-sink assembly
29. Removing the power-button module
30. Replacing the power-button module
31. Removing the system board
32. Replacing the system board
33. Removing the display assembly
34. Replacing the display assembly
35. Removing the display bezel
36. Replacing the display bezel
37. Removing the display panel
38. Replacing the display panel
39. Removing the display hinges
40. Replacing the display hinges
41. Removing the display cable
42. Replacing the display cable
43. Removing the display back-cover and antenna assembly
44. Replacing the display back-cover and antenna assembly
45. Removing the camera
46. Replacing the camera
47. Removing the power-adapter port
48. Replacing the power-adapter port
49. Removing the palm-rest assembly
50. Replacing the palm-rest assembly
51. Flashing the BIOS
For Complette DELL Inspiron 15 5559 Service Manual PDF file, please download here : DELL Inspiron 15 5559 Service Manual.pdf
DELL Inspiron 15 5559 Device Overview :
Front Views

1. Power and battery-status light/hard-drive activity light
Indicates the power and battery ?charge status.
Press Fn+H to toggle this light between hard?drive activity light and battery ?status light.
Solid white, Power adapter is connected and the battery has more than 5% charge.
Amber, Computer is running on battery and the battery has less than 5% charge.
Off,
Indicates the power and battery ?charge status.
Press Fn+H to toggle this light between hard?drive activity light and battery ?status light.
Solid white, Power adapter is connected and the battery has more than 5% charge.
Amber, Computer is running on battery and the battery has less than 5% charge.
Off,
• Power adapter is connected and the battery is fully charged.
• Computer is running on battery and the battery has more than 5% charge.
• Computer is in sleep state, hibernation, or turned off.
• Computer is running on battery and the battery has more than 5% charge.
• Computer is in sleep state, hibernation, or turned off.
Left Views:

1. Power-adapter port
Connect a power adapter to provide power to your computer and charge the battery.
2. Network port
Connect an Ethernet (RJ45) cable from a router or a broadband modem for network or internet access.
3. HDMI port
Connect a TV or another HDMI?in enabled device. Provides video and audio output.
4. USB 3.0 port
Connect peripherals such as storage devices, printers, and so on. Provides data transfer speeds up to 5 Gbps.
5. Media-card reader
Reads from and writes to media cards
Connect a power adapter to provide power to your computer and charge the battery.
2. Network port
Connect an Ethernet (RJ45) cable from a router or a broadband modem for network or internet access.
3. HDMI port
Connect a TV or another HDMI?in enabled device. Provides video and audio output.
4. USB 3.0 port
Connect peripherals such as storage devices, printers, and so on. Provides data transfer speeds up to 5 Gbps.
5. Media-card reader
Reads from and writes to media cards
Right Views

1. Headset port
Connect a headphone, a microphone, or a headphone and microphone combo (headset).
2. USB 2.0 ports (2)
Connect peripherals such as storage devices, printers, and so on. Provides data transfer speeds up to 480 Mbps.
3. Optical drive
Reads from and writes to CDs and DVDs.
4. Security-cable slot
Connect a security cable to prevent unauthorized movement of your computer.
Connect a headphone, a microphone, or a headphone and microphone combo (headset).
2. USB 2.0 ports (2)
Connect peripherals such as storage devices, printers, and so on. Provides data transfer speeds up to 480 Mbps.
3. Optical drive
Reads from and writes to CDs and DVDs.
4. Security-cable slot
Connect a security cable to prevent unauthorized movement of your computer.
Base Views
1. Left-click area
Press to left click.
2. Touch pad
Move your finger on the touch pad to move the mouse pointer. Tap to left click.
3. Right-click area
Press to right click.
4. Power button
Press to turn on the computer if it is turned off, in sleep state, or in hibernate state.
Press to put the computer in Sleep state if it is turned on.
Press and hold for 4 seconds to force shut?down the computer.
Press to left click.
2. Touch pad
Move your finger on the touch pad to move the mouse pointer. Tap to left click.
3. Right-click area
Press to right click.
4. Power button
Press to turn on the computer if it is turned off, in sleep state, or in hibernate state.
Press to put the computer in Sleep state if it is turned on.
Press and hold for 4 seconds to force shut?down the computer.
Display Views

1. Left microphone
Provides high?quality digital sound input for audio recording, voice calls, and so on.
2. Camera
Allows you to video chat, capture photos, and record videos.
3. Camera-status light
Turns on when the camera is in use.
4. Right microphone
Provides high?quality digital sound input for audio recording, voice calls, and so on.
Provides high?quality digital sound input for audio recording, voice calls, and so on.
2. Camera
Allows you to video chat, capture photos, and record videos.
3. Camera-status light
Turns on when the camera is in use.
4. Right microphone
Provides high?quality digital sound input for audio recording, voice calls, and so on.
DELL Inspiron 15 5559 Specifications :
For Complette DELL Inspiron 15 5559 Specifications, please clik here :
DELL Inspiron 15 5559 Specifications.pdf
Available link for download
Saturday, January 21, 2017
FREE DELL Inspiron 5425 User Manual Troubleshooting Download PDF File
FREE DELL Inspiron 5425 User Manual Troubleshooting Download PDF File
The DELL Inspiron 5425 User Manual & Troubleshooting has been released by dell at their website. The DELL Inspiron 5425 User Manual & Troubleshooting is provided in PDF document format (84-pages, PDF, 3.18 MB) that you can download directly from dell website. You can read this DELL Inspiron 5425 User Manual & Troubleshooting by using PDF reader software/application. The DELL Inspiron 5425 User Manual & Troubleshooting contains complete reference information about how to operate and service the DELL Inspiron 5425 properly, such as how to replacing the switch, how to replacing the keyboard, how to replacing the memory modul, how to replacing the hardrive, how to replacing the optical drive, how to replacing the processor, basic troubleshooting and many more.
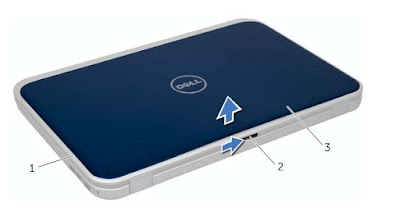
Table Contetns :
1. Before You Begin
2. After Working Inside Your Computer
3. Switch
4. Battery
5. Keyboard
6. Base Cover
7. Memory Module(s)
8. Hard Drive
9. Optical Drive
10. Palm Rest
11. Power-Adapter Port
12. Display Assembly
13. Camera Module
14. System Board
15. Thermal-Cooling Assembly
16. Processor
17. Coin-Cell Battery
18. Speakers
19. Media Card Reader
20. Daughter Board
21. Mini-Card
22. Flashing the BIOS
How to Removing & Replacing the Switch
Removing the switch :
1. Slide the switch release latch to the side.The switch pops up.
2. Lift the switch off the computer.
2. Lift the switch off the computer.
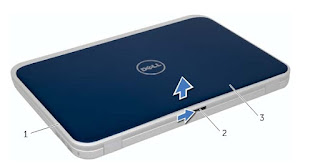
1. display cover
2. switch release latch
3. switch
3. switch
Replacing the Switch :
1. Align the tabs at the bottom of the switch with the slots on the display cover and snap the switch into place.

1. display cover
2. slots
3. tabs
3. tabs
4. switch
2. Follow the instructions in "After Work ing Inside Your Computer" on page 9.
How To Removing & Replacing the Keyboard
Removing the keyboard :
1. Turn the computer over and open the display as far as possible.
2. Using a plastic scribe, release the keyboard from the tabs on the palm rest and ease the keyboard up until it clears off the palm rest.
2. Using a plastic scribe, release the keyboard from the tabs on the palm rest and ease the keyboard up until it clears off the palm rest.
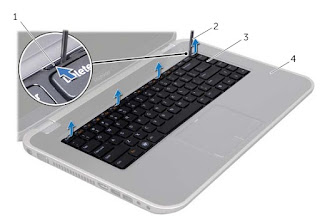
1. tabs (4)
2. plastic scribe
3. keyboard
3. keyboard
4. palm rest
3. Carefully turn the keyboard over and place it on the palm rest.
4. Lift the connector latch and pull the pull- tab to disconnect the keyboard cable from the connector on the system board.
4. Lift the connector latch and pull the pull- tab to disconnect the keyboard cable from the connector on the system board.
5. Lift the keyboard away from the computer.
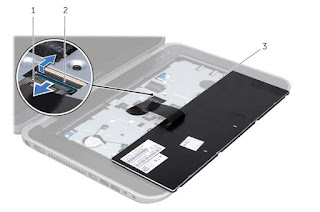
1. keyboard cable
2. connector latch
3. tabs (5)
3. tabs (5)
Replacing the Keyboard:
1. Slide the keyboard cable into the connecto r on the system board and press down on the connector latch to secure the cable.
2. Slide the tabs at the bottom of the keyboard into the slots on the palm rest and place the keyboard on the palm rest.
3. Gently press around the edges of the keyboard to secure the keyboard under the tabs on the palm rest.
4. Close the display and turn the computer over.
2. Slide the tabs at the bottom of the keyboard into the slots on the palm rest and place the keyboard on the palm rest.
3. Gently press around the edges of the keyboard to secure the keyboard under the tabs on the palm rest.
4. Close the display and turn the computer over.
For Complete DELL Inspiron 5425 User Manual & Troubleshooting pdf file, please click link below :
Download pdf file : DELL Inspiron 5425 User Manual & Troubleshooting.pdf
Download pdf file : DELL Inspiron 5425 User Manual & Troubleshooting.pdf
Available link for download
Subscribe to:
Posts (Atom)